FREE 5-Ingredient Recipe EBook
- Why You Need My Beef Tenderloin Recipe
- Ingredients & Substitutions
- How To Tie Your Roast
- How To Cook Beef Tenderloin
- My Tips For Perfect Results
- How Long To Cook Beef Tenderloin?
- Serving Ideas
- Beef Tenderloin Recipe (Tender & Easy) Recipe card
- Recipe Reviews
Is there anything more luxurious than a perfectly roasted beef tenderloin? Filet mignon is my fave for special dinners, but when I have a larger crowd for the holidays, there’s nothing I love more than cooking a whole beef tenderloin roast. It’s surprisingly easy to make, it can feed a lot of people, and I guarantee it will impress everyone at your table. My beef tenderloin recipe is melt-in-your-mouth tender with a buttery, garlicky flavor that will have you thinking about it days later. I sure do. Make it with me for your next special occasion!
Why You Need My Beef Tenderloin Recipe

- Tender and juicy with a flavorful, golden crust – My go-to stovetop-to-oven method locks in moisture for the best of both worlds: a beautifully seared crust and a melt-in-your-mouth inside. You might’ve seen this method in my sirloin steak recipe , but I use it for roasts as well, including pork sirloin roast and sirloin tip roast . This beef tenderloin recipe is my all-time favorite.
- Rich garlic butter flavor – I infused this roast with garlic butter and fresh herbs, so every bite is packed with savory flavor… without the effort of making a separate sauce.
- Foolproof timing – Timing is everything here! I’ve got an easy time and temperature chart to help you cook beef tenderloin perfectly every time.
- Perfect for special occasions – This recipe is as festive as it gets. It’s amazing for your Christmas dinner , Easter , Hanukkah, New Year’s Eve , or any other special meal when you’ve got guests. And it’s going to wow all of them!


Ingredients & Substitutions
Here I explain the best ingredients for my beef tenderloin roast recipe, what each one does, and substitution options. For measurements, see the recipe card .
- Beef Tenderloin – The best beef tenderloin recipes start with quality beef! For the freshest cut of meat, I always go to my butcher. You can choose Prime (the most tender and flavorful), Choice (great quality and more affordable), or Select (a leaner, budget-friendly option). I highly recommend going for the best quality you can afford — you’ll taste the difference! Make sure to get a whole roast, not steaks, but if your butcher gives you sliced, use it for my filet mignon recipe or shish kabobs .
- Sea Salt & Black Pepper – My rule of thumb is always 1 teaspoon of salt and 1/4 to 1/2 teaspoon of pepper per pound of meat.
- Butter – Use unsalted (I like this brand ), softened to room temp. If you’ve got compound butter already made, go ahead and use it to save time.
- Garlic – Fresh minced garlic tastes the best in this beef tenderloin recipe, but a tablespoon of the jarred stuff will do in a pinch.
- Fresh Herbs – I used thyme and rosemary. Feel free to swap in any fresh herbs you love.
- Dijon Mustard – Optional, but it adds great flavor and even helps tenderize the meat!
- Olive Oil – For searing. Avocado oil works well, too.

How To Tie Your Roast
Before making this beef tenderloin recipe, you’ll need to tie it with butcher’s twine to keep it from spreading as it cooks. This keeps it looking nice and locks the juices inside!
- Cut, trim, and tuck. Cut the tenderloin in half and trim off any silver skin on the edges. Tuck the thin end under, so the whole piece is about the same thickness (or cut off any really thick end if needed). Pat it dry. If you have time, leave it in the fridge uncovered overnight.
- Tie the first knot. Grab your kitchen twine and tie a knot around one end to secure it.
- Loop it around. Wrap the twine around your hand to form a loop, then slide it off your hand and place it over the beef tenderloin.
- Pull tight. Take hold of the twine and pull it snug.

- Repeat. Continue looping and pulling the twine along the length of the beef. When you reach the end, flip it over and wrap the twine around to secure the other side.
- Tie at the end. Slide the twine underneath the loop on the other side, and tie it to the first knot to secure. Repeat with the second piece of meat. Your tied beef tenderloin should look like my pictures below!

How To Cook Beef Tenderloin
I have step-by-step photos here to help you visualize the recipe. For full instructions with amounts and temperatures, see the recipe card .
- Season liberally. Pat the beef tenderloin dry again, and generously season all sides with salt and pepper. Let it sit at room temperature for 1 hour before cooking.
- Make the compound butter. While you wait, mash together the butter, garlic, rosemary, thyme, and Dijon mustard in a small bowl.


- Sear the outside. Heat the olive oil in a cast iron skillet over medium-high heat, until shimmering and screaming hot. Add the tenderloin pieces, keeping them apart, and sear on all four sides until golden brown. Sear for slightly less time on the last side.
- Slather on the butter. Then, insert a probe thermometer (if you have one — highly recommend!) into the thickest part.


- Roast the beef tenderloin recipe in the oven. Check my time chart below to get the doneness you like! Transfer to a cutting board right away (so it doesn’t overcook), and let it rest for the juices to settle.

My Tips For Perfect Results
- Tie it up tightly (see above for details). Keep tension on the twine as you go! Not only does this help retain shape and look better, it also makes your beef tenderloin cook more evenly.
- Drying in the fridge overnight is optional, but gets you a better crust. You can do this either before or after tying it. This roast is still pretty great if you forget, though.
- Don’t skip the step of bringing to room temperature. I do this for all my meats for even cooking (when I’ve got time), but especially recommend it for an expensive cut of meat like this! In my beef tenderloin recipe, waiting an hour after seasoning also allows the salt and pepper to act as a dry brine.
- Choose the right pan . I highly recommend a cast-iron pan like this one . Other materials don’t heat as evenly and won’t give that nice sear. But if your pan is not oven-safe, you can transfer to a roasting pan with rack instead.
- Crank up the heat to sear. You want the pan super hot to get that golden crust on your roast beef tenderloin.
- Sear on all 4 sides. Unlike a steak you cook on 2 sides, roasts are thick enough to sear all 4. And my baking times are based on searing all 4 sides first.
- Be careful not to overcook. Since this is a lean cut of beef, it will be dry if you bake it to medium well or well done. I recommend medium rare (like my pictures here) to medium doneness. See my tips for perfect cook time below.
- Know when and how to slice. Resist the urge to cut right away! You’ll release all the juices, leaving the meat dry. Let your roast rest on a cutting board for 10-15 minutes first. Then, slice against the grain (across the direction of the lines), which will make each bite more tender.

How Long To Cook Beef Tenderloin?
After searing, my rule of thumb for beef tenderloin cooking time is 5-8 minutes per pound for rare, 6-9 for medium-rare, 7-10 for medium, and 8-11 for medium-well. My roast was 4 pounds and took about half an hour after the sear.
I highly recommend a probe thermometer — it’s foolproof because it beeps when the tenderloin hits the right temp — but a regular meat thermometer works. Follow my chart to set the temperature, or use these time ranges if you don’t have a thermometer:
- Note: My temperatures above are when you’d remove the beef tenderloin roast from the oven. The temp will rise about 10 degrees while resting.

Serving Ideas
For my picture above, I served this roasted beef tenderloin recipe with roasted green beans and butternut squash . Try these other ideas for your holiday meal:
- Vegetables – Try my smashed brussels sprouts , roasted root vegetables , or green beans almondine for something easy, yet impressive. For comfort food, I love a cheesy cauliflower casserole or creamy spinach .
- Potatoes – Whip up some mashed sweet potatoes or oven roasted potatoes for something simple, mashed cauliflower or rutabaga for lighter alternatives, or my healthy sweet potato casserole for the ultimate holiday dish.
- Salads – My pomegranate salad or holiday salad are always festive, but you can’t go wrong with wedge salad for a steakhouse experience.
- Toppings – My recipe for beef tenderloin is already so tender that it doesn’t need a sauce, but you can add some sauteed mushrooms , caramelized onions , or blue cheese sauce if you want to get fancy.
Ingredients
Tap underlined ingredients to see the ones I use.
- 1 4-lb Beef tenderloin (trimmed to remove silver skin – the butcher can do this for you) ▢
- 4 tsp Sea salt (1 teaspoon per pound of meat) ▢
- 1 tsp Black pepper (1/4 teaspoon per pound of meat) ▢
- 6 tbsp Butter (softened at room temperature) ▢
- 6 cloves Garlic (minced) ▢
- 1 tbsp Fresh thyme ▢
- 1 tbsp Fresh rosemary (chopped) ▢
- 1 tsp Dijon mustard (optional) ▢
- 2 tbsp Olive oil ▢
Instructions
Tap on the times in the instructions to start a kitchen timer.
- Cut the beef tenderloin in half crosswise. Pat dry with paper towels. If you have time, place the beef tenderloin in the fridge, uncovered, for 8-12 hours or overnight. (This is not absolutely necessary, but helps create a better outer crust when searing, so do it if you can.)
- Tuck the long, thin end underneath. Use kitchen twine to tie each piece of tenderloin tightly, at one-inch intervals – see post above for instructions and pictures for how to tie it.
- Pat the beef with paper towels again. Season all over with salt and pepper. Let it come to room temperature on the counter for 1 hour before cooking.
- Preheat the oven to 400 degrees F (204 degrees C).
- In a small bowl, mash together the butter, garlic, rosemary, thyme, and Dijon mustard (if using). Set aside.
- Heat the olive oil in a large cast iron skillet over medium-high heat, until shimmering and very hot. Add the beef tenderloin pieces, without touching each other, and sear on all four sides, about 2-3 minutes per side, until a brown crust forms. (If the beef doesn’t want to stay on one of the sides, use tongs to hold it against the pan.) Sear for slightly less time on the last side, as it will continue to sear while you spread on the butter in the next step.
- Working quickly, immediately spread the butter mixture over the beef, insert a probe thermometer into the thickest part in the center, and transfer to the preheated oven. (Alternatively, if searing in a pan that is not oven-safe, transfer to a roasting pan before placing in the oven.)
- Roast beef tenderloin in the oven until it reaches your desired internal temperature: 115 degrees F for rare (20-30 minutes), 125 degrees F for medium rare (25-35 minutes), 135 degrees F for medium (30-40 minutes), 145 degrees F for medium well (35-45 minutes), or 155 degrees F for well done (40-50 minutes). (Temperature will continue to rise while resting in the next step.) For the juiciest beef, medium rare to medium is recommended.
- To prevent overcooking, immediately transfer the roasted beef tenderloin to a cutting board after removing from the oven. Let it rest for 10-15 minutes to allow the juices to settle – the internal temperature will rise an additional 5-10 degrees.
LAST STEP: Leave a rating to help other readers, or tag me @wholesomeyum on Instagram. I’d love to hear from you!
Maya’s Recipe Notes
Serving size: ~1/3 lb (weight prior to cooking), or 1/12 of the entire roast
- Tips and timing: Check out my recipe tips above to help you cook beef tenderloin to juicy perfection with a perfect crust, and my time chart to get exactly the doneness you like.
- Store: Keep leftovers in an airtight container in the refrigerator for up to 3-5 days. They make an amazing steak salad !
- Reheat: I find it best to reheat this beef tenderloin recipe in the oven at a low temperature, 250-300 degrees F. Wrap it in 2 layers of foil and place directly onto the oven grates (a baking dish is more likely to overcook it), and bake for 10-15 minutes, until warm.
- Freeze: You can freeze the raw meat for up to 1 year, or cooked for up to 3 months.
I provide nutrition facts as a courtesy. Have questions about calculations or why you got a different result? Please see my nutrition policy .
Add Your NotesYour Notes
© Copyright Maya Krampf for Wholesome Yum. Please DO NOT SCREENSHOT OR COPY/PASTE recipes to social media or websites. We’d LOVE for you to share a link with photo instead.
Roasted Beef Tenderloin Recipe

Free Printable: Low Carb & Keto Food List
- Want The Keto Cheat Sheet Printable PDF System?
- The Basic Keto Meal Formula
- Understanding Macros
- Keto Food Swaps
- Keto Food List
- Electrolyte Basics
- Keto Diet Types
- Want The Keto Cheat Sheet Printable PDF System?
- Recipe Reviews
Even though I have a great guide to starting a keto diet , people often ask me for a quick keto cheat sheet they can use. That’s why I created this simple keto diet cheat sheet , so that you can have all the info you need handy. We’ll cover the basic keto formula for building meals, foods to eat and to avoid, delicious keto swaps for high-carb foods, electrolyte basics, and 4 ways to follow the keto lifestyle.
You can keep reading to view this info, or download my keto cheat sheet printable pdf to print out or save ad-free on any device (plus the pdf has more details!).
Want The Keto Cheat Sheet Printable PDF System?
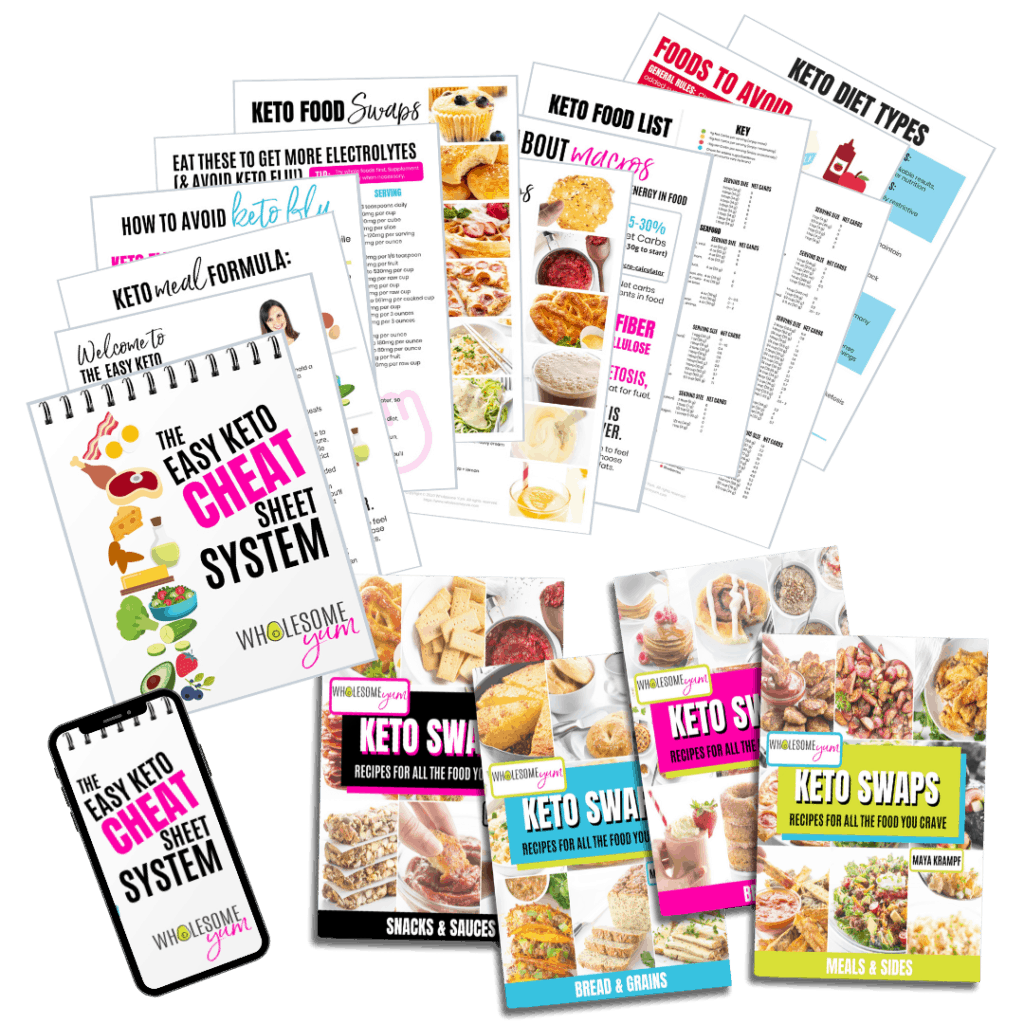
Get all this information and MORE in convenient printer-friendly format – 13 cheat sheet pages you can take with you anywhere or keep in your kitchen, plus 4 recipe cookbooks! Includes:
- Keto food list (230+ foods) – Super detailed & color-coded, with net carb counts, so you’ll know exactly what to eat.
- Foods to avoid on keto – Detailed and specific list so that you know exactly what to watch out for.
- Macros cheat sheet – Explains everything you need to know about macros to succeed on keto.
- Keto food swaps (60+ foods) – Covers virtually every food you love, so you don’t have to miss out!
- Keto meal formula – With specific food ideas, so it’s easy to mix-and-match.
- Keto flu guide – Understand what it is and exactly how to avoid it.
- Electrolyte cheat sheet – With whole food ideas + bonus keto tips.
- Keto Diet Types – Summary of 4 ways to do keto, so you can choose what fits you best.
- FOUR (4!) Keto Swaps Recipe EBooks – Dozens of recipes to replace bread, rice, potatoes, pasta, desserts, and other carbs you’d otherwise miss.
Get The Printable Keto Cheat Sheet System + EBooks (Only $37)
The Basic Keto Meal Formula
Eating keto doesn’t have to be complicated! While there are plenty of delicious easy keto recipes to choose from, you don’t even have to cook from a recipe to get started.
Simply follow the keto cheat sheet formula of protein + veggie + fat for your meals.
Be sure to choose a moderate amount of protein, only low carb vegetables (mostly ones that grow above ground), and generous fat to attain an optimal macro ratio. That’s approximately 60-75% of calories from fat, 20-25% protein, and 5-10% from carbohydrates. The table below will give you ideas for what to choose.
| Pick A Protein | Pick A Veggie | Add Fat |
|---|---|---|
| Beef Chicken Pork Eggs Lamb Turkey Fish Shellfish Protein powder Venison | Cauliflower Broccoli Zucchini Leafy Greens Cucumbers Brussels Sprouts Cabbage Asparagus Radishes Bell Peppers Jicama Celery | Butter Avocado Oil Cheese Bacon Avocado Lard Ghee Mayo Nuts MCT Oil |
Understanding Macros
Macros are macronutrients for short. They include fat, protein, and carbohydrates.
You can calculate your own macros using the macro calculator , but the macro keto cheat sheet below will explain how to look at macros when following a keto lifestyle.
Carbs Are A Limit.
Keeping carbs low is what gets you into ketosis and keeps you there. Ketosis means that you’re using fat as your primary energy source instead of sugar, and requires keeping carbs very low.
A good starting point is 20-25 grams net carbs per day, but you can experiment after a few weeks to see if your body stays in ketosis at higher levels. People who are very active may be able to do more and stay in ketosis, up to around 50 grams per day.
“Carbs are a limit” means that you set a limit for how many carbs to eat per day and don’t exceed it. You don’t have to hit that limit, so if you’re under that’s okay, just don’t go over. Ideally most of your carbs would come from low carb vegetables, and if you’re eating enough veggies, you’ll usually get close to the limit naturally.
A common misconception is that reaching ketosis requires a certain macro ratio, but it’s really only restricting your carb intake that gets you there [ * ]. In the absence of sufficient carbs to use as energy, the body will switch to using fat as fuel. This is called the metabolic state of ketosis.
Protein Is A Goal.
Protein is made up of amino acids, the building blocks of all our cells. It’s a crucial for keeping our muscles strong and for many cellular functions [ * ].
“Protein is a goal” means that you always want to eat enough protein to reach the goal each day, but not exceed it too much. You want enough for your needs, but excess protein can trigger gluconeogenesis, which is protein being converted to sugar [ * ] and can kick you out of ketosis.
Fat Is A Lever.
Fat is the primary macronutrient in a keto lifestyle, because being in ketosis means that fat is your primary fuel source. Fat as a fuel source will come from your food, and if you are losing weight, from your body.
A big advantage of a keto lifestyle is the high fat intake. It keeps you full and satisfied, making it easier to stick to, and using it as the primary fuel source makes it easier on your body to burn body fat, with a lower chance of breaking down your muscle (provided you get enough protein).
Aside from reaching your protein goal and limiting your carbs, the remainder of your calories on a keto diet comes from fat.
Don’t fear fat – it’s your main energy source on keto, and getting enough of it trains your body to use fat for fuel instead of sugar. That means that as long as you are not overdoing your overall calorie intake, you’ll efficiently burn your body fat for fuel as well.
“Fat is a lever” means that you can increase or decrease your fat intake depending on your goals and hunger levels. Increase it (along with exercise) to gain muscle, or decrease it to lose weight.
Keto Food Swaps
One of my favorite challenges is creating recipes, or just discovering, keto food swaps. These are delicious keto replacements for traditionally high-carb or high-sugar foods.
So, I created this keto diet cheat sheet with all the swaps in one place! I also have more keto food swaps in my Easy Keto Cookbook .
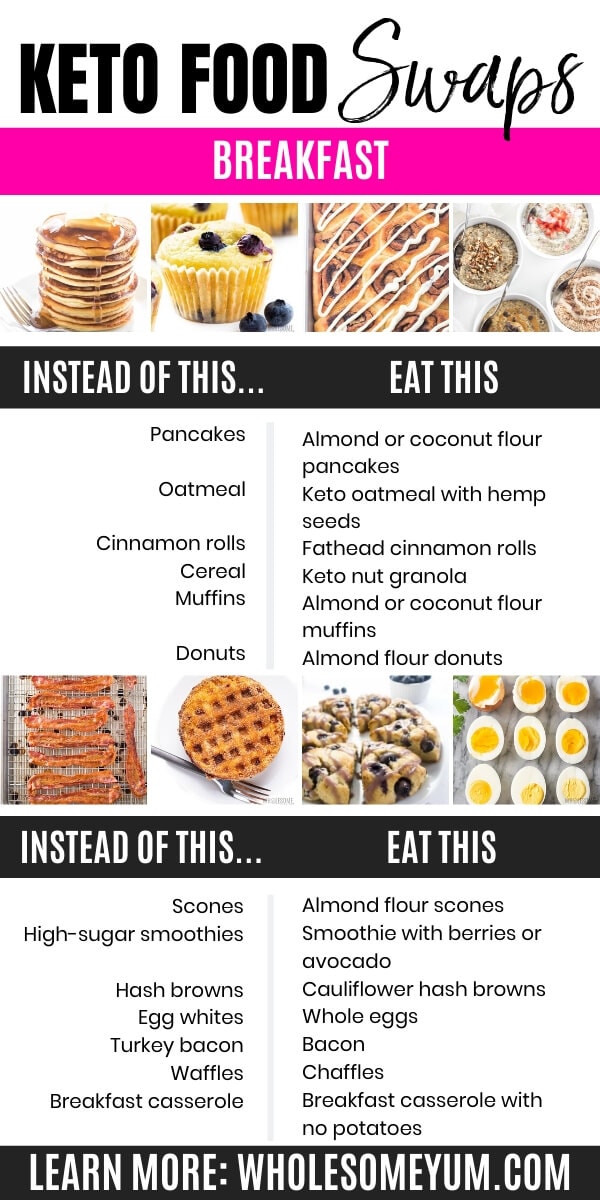
Keto Swaps For Breakfast
| Instead Of This… | Eat This |
|---|---|
| Pancakes | Almond flour pancakes or coconut flour pancakes |
| Oatmeal | Keto oatmeal with hemp seeds |
| Cinnamon rolls | Fathead cinnamon rolls |
| Cereal | Keto nut granola |
| Muffins | Almond flour muffins or coconut flour muffins |
| Donuts | Almond flour donuts |
| Scones | Almond flour scones |
| High-sugar smoothies | Smoothie with berries or avocado |
| Hash browns | Cauliflower hash browns |
| Breakfast casserole | Breakfast casserole with no potatoes |
| Egg whites | Whole eggs |
| Turkey bacon | Bacon |
| Waffles | Chaffles |
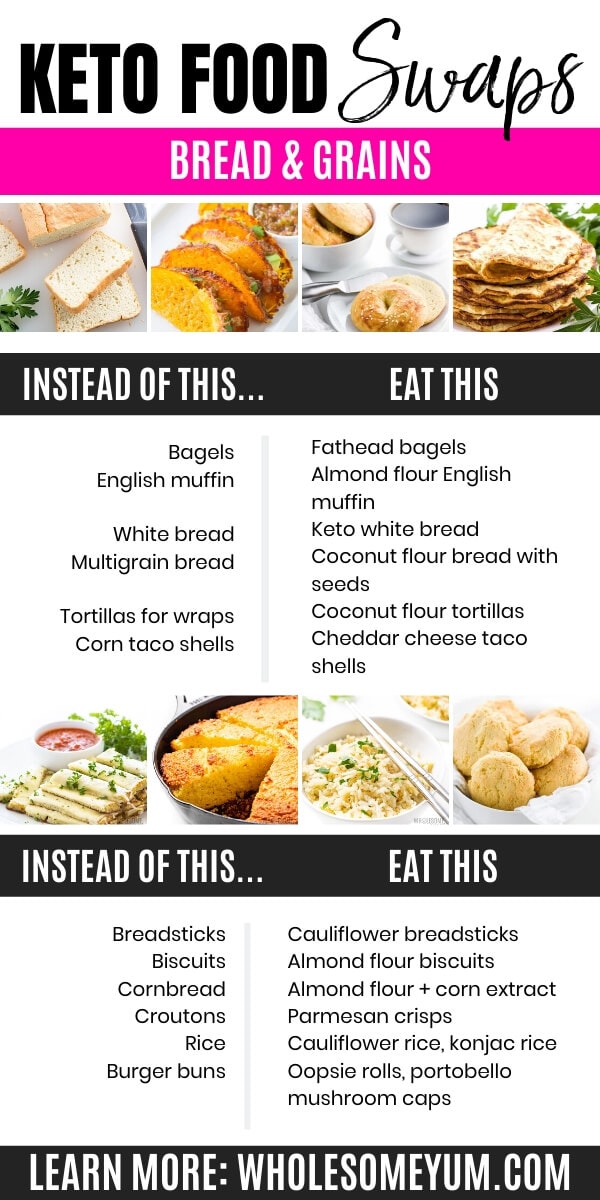
Keto Swaps For Bread
| Instead Of This… | Eat This |
|---|---|
| Bagels | Fathead bagels |
| English muffin | Almond flour English muffin |
| White bread | Keto white bread |
| Multigrain bread | Coconut flour bread with seeds |
| Tortillas for wraps | Coconut flour tortillas |
| Corn taco shells | Cheddar cheese taco shells |
| Burger buns | Oopsie rolls , portobello mushroom caps |
| Breadsticks | Cauliflower breadsticks |
| Biscuits | Almond flour biscuits |
| Cornbread | Almond flour cornbread |
| Croutons | Parmesan crisps |
| Rice | Cauliflower rice , konjac rice |
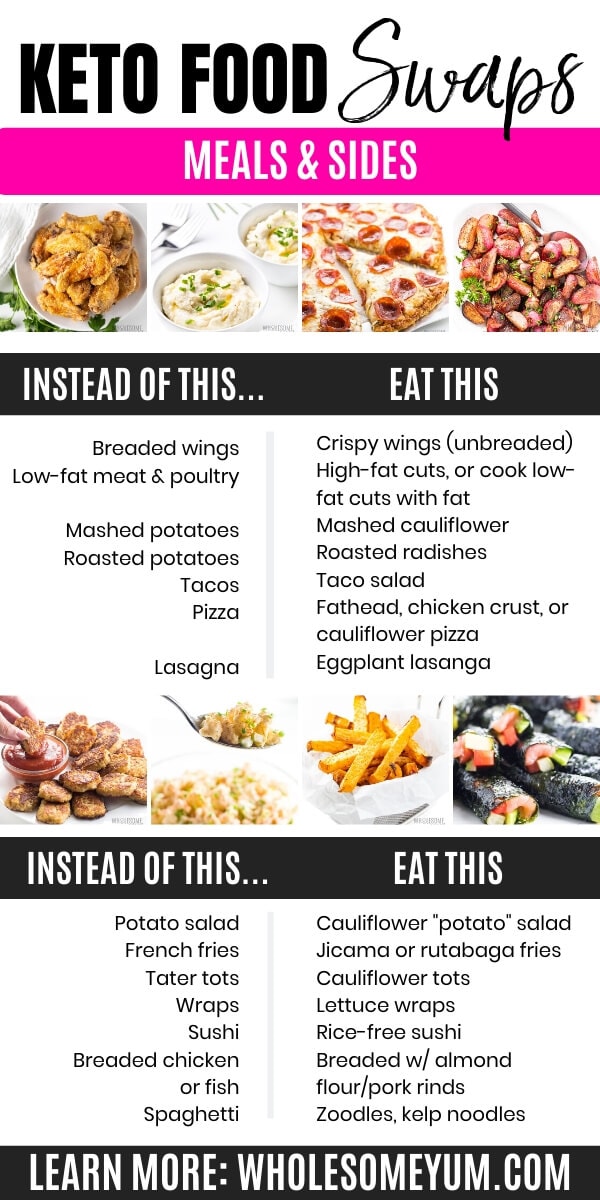
Keto Swaps For Meals & Side Dishes
| Instead Of This… | Eat This |
|---|---|
| Breaded wings | Crispy air fryer wings (unbreaded) |
| Low-fat meat & poultry | High-fat cuts, or cook low-fat cuts with fat |
| Mashed potatoes | Mashed cauliflower |
| Roasted potatoes | Roasted or fried radishes |
| Tacos | Taco salad |
| Pizza | Fathead crust , chicken crust , or cauliflower crust pizza |
| Lasagna | Eggplant lasagna |
| Potato salad | Cauliflower “potato” salad |
| French fries | Jicama , rutabaga , or zucchini fries |
| Tater tots | Cauliflower tots |
| Wraps | Lettuce wraps , almond flour tortillas |
| Sushi | Naruto-style or homemade rice-free sushi |
| Breaded chicken or fish | Breaded cuts with almond flour or pork rinds |
| Spaghetti | Zoodles , spaghetti squash , shirataki noodles, kelp noodles |
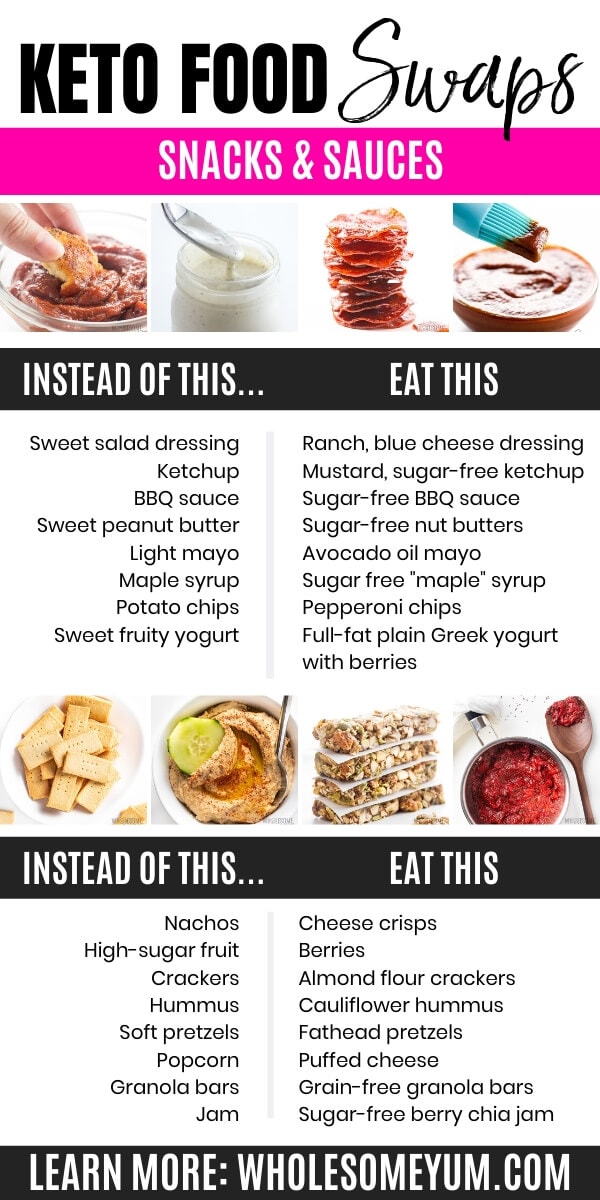
Keto Swaps For Snacks & Sauces
| Instead Of This… | Eat This |
|---|---|
| Nachos | Cheese crisps |
| High-sugar fruit | Berries & other keto fruits |
| Crackers | Almond flour crackers |
| Hummus | Cauliflower hummus |
| Soft pretzels | Fathead pretzels |
| Popcorn | Puffed cheese |
| Granola bars | Grain-free granola bars |
| Jam | Sugar-free berry chia jam |
| Sweet fruity yogurt | Full-fat plain Greek yogurt with berries |
| Sweet salad dressing | Ranch , blue cheese , or plain vinaigrette |
| Ketchup | Mustard and/or sugar-free ketchup |
| BBQ sauce | Sugar-free BBQ sauce |
| Sweetened peanut butter | Natural, sugar-free nut butters |
| Light mayo | Avocado oil mayo |
| Maple syrup | Sugar-free, maple flavored syrup |
| Potato chips | Zucchini chips , pepperoni chips , pork rinds |
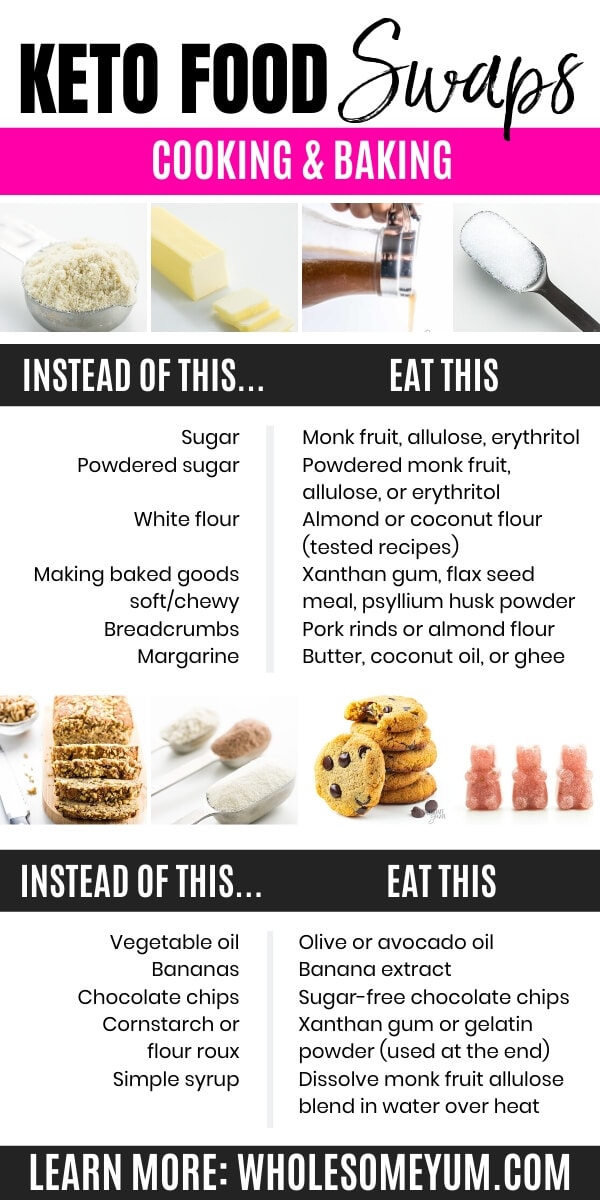
Keto Swaps For Cooking & Baking
| Instead Of This… | Eat This |
|---|---|
| Sugar | Monk fruit or allulose |
| Powdered sugar | Powdered monk fruit or allulose |
| White flour | Almond or Coconut flour (use in tested recipes) |
| Making baked goods soft/chewy | Xanthan gum, flax seed meal, psyllium husk powder |
| Breadcrumbs | Pork rinds or almond flour |
| Margarine | Butter, coconut oil, or ghee |
| Vegetable oil | Olive or avocado oil |
| Bananas | Banana extract |
| Chocolate chips | Sugar-free chocolate chips |
| Cornstarch or flour roux | Xanthan gum or gelatin powder (used at the end) |
| Simple syrup | Dissolve monk fruit allulose blend in water over heat |
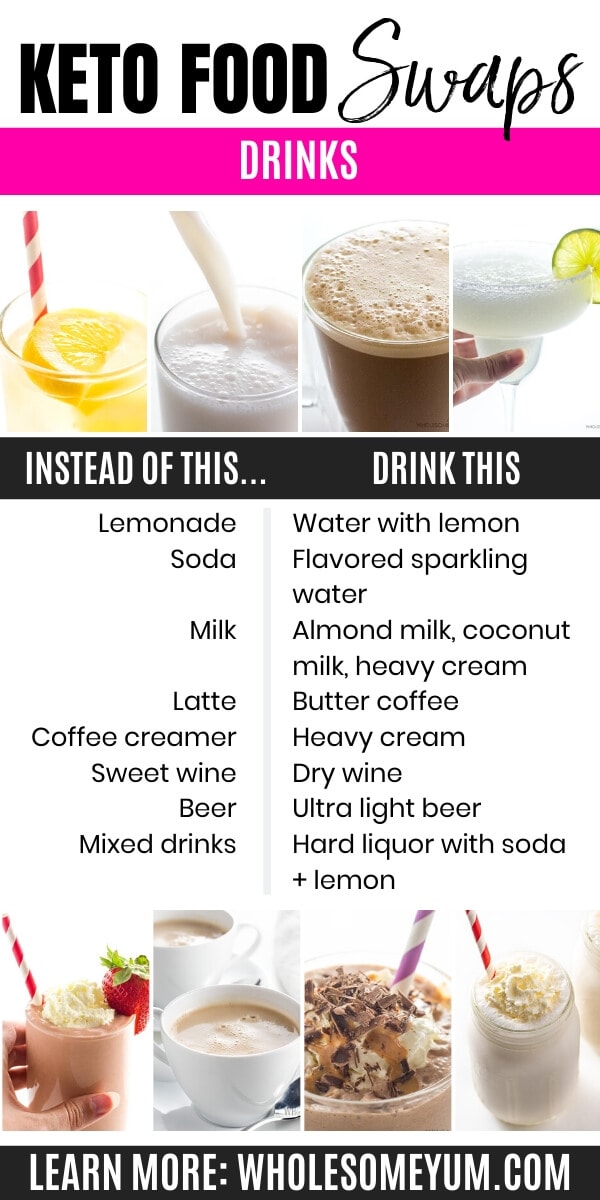
Keto Swaps For Drinks
| Instead Of This… | Eat This |
|---|---|
| Lemonade | Water with lemon |
| Soda | Flavored sparkling water |
| Milk | Almond milk, coconut milk, heavy cream |
| Latte | Butter coffee |
| Coffee creamer | Heavy cream |
| Sweet wine | Dry wine |
| Beer | Ultra light beer |
| Mixed drinks | Hard liquor with soda + lemon |
If you’re looking specifically for keto alcohol options, browse the full keto alcohol guide .
Keto Food List
When looking for a keto cheat sheet printable, the most-requested information is a keto food list.
The great thing is that keto doesn’t have to feel restrictive. It’s incredibly satisfying and there’s such a wide variety of foods you can eat!
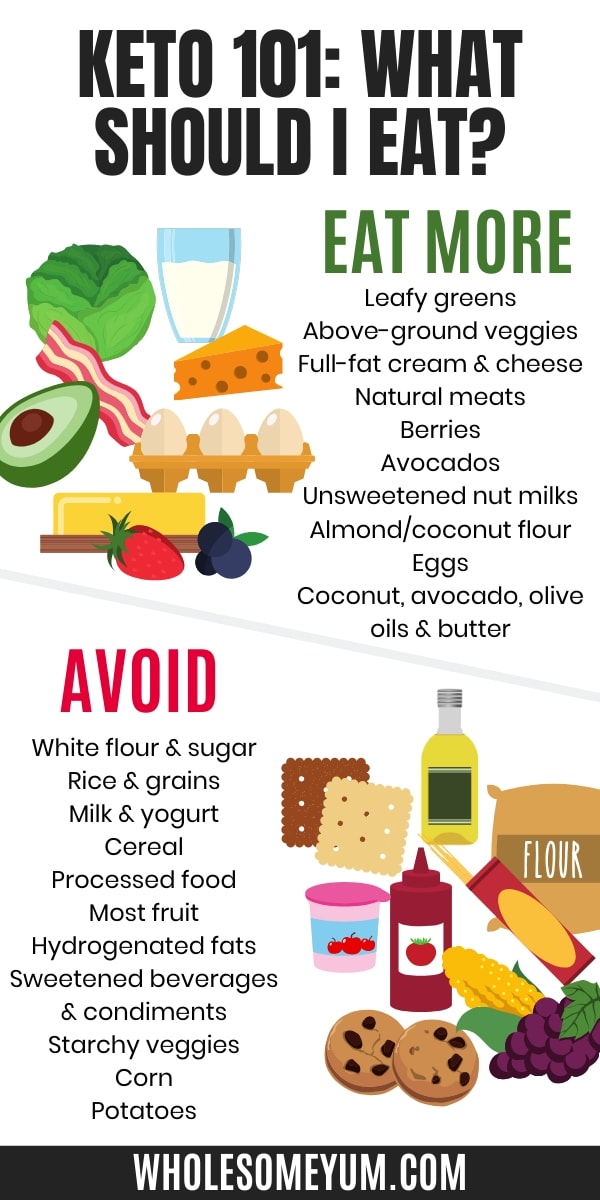
Foods To Eat On Keto
- Leafy greens – Such as spinach, chard, and lettuce.
- Above-ground veggies – Such as peppers, zucchini, and cauliflower.
- Full-fat cream & cheese – Such as heavy cream, sour cream, and full-fat hard cheeses.
- Natural meats – Such as beef, lamb, and pork.
- Berries – Such as raspberries, blackberries, and strawberries.
- Avocados
- Unsweetened nut milks – Such as almond milk and coconut milk.
- Almond flour and coconut flour
- Eggs
- Healthy fats – Such as coconut oil, avocado oil, olive oil and butter.
Foods To Avoid On Keto
- White flour & sugar
- Rice & grains – Such as barley, wheat, and corn.
- Milk & yogurt – Such as fruit on the bottom yogurt, sweetened Greek yogurt, and all milk.
- Cereal
- Processed food – Such as granola bars, candy
- Most fruit – Such as apples, bananas, and grapes
- Hydrogenated fats – Such as vegetable oil, soybean oil, and margarine
- Sweetened beverages & condiments – Such as soda, ketchup, and sweet dressings
- Starchy veggies – Such as peas, carrots, and beets.
- Potatoes – Such as sweet potatoes and white potatoes.
That’s the short keto diet cheat sheet version of all the keto food categories, but I recommend downloading the full Keto Cheat Sheet System. It includes a super detailed printable keto food list with over 100 items, including 2 color-coded pages with net carb counts, along with 6 more pages of keto cheat sheets:
Get The Keto Cheat Sheet System PDF (Only $37)
Electrolyte Basics
Getting enough electrolytes is crucial for anyone, but especially so on a keto diet. The reason is that ketosis has a diuretic effect, which increases excretion of water and electrolytes, especially sodium [ * ]. This is often the cause of the keto flu.
For more details on electrolytes and avoiding keto flu, check out the full keto flu guide here .
The important thing to know about electrolytes is that replenishing them will keep keto flu away and keep your body functioning well. I always recommend an electrolyte drink and whole food sources of anything your body needs before resorting to supplements, so I made a list of what to eat to get each of the 3 major electrolytes – sodium, magnesium and potassium.
Here’s your keto diet cheat sheet for getting electrolytes from food:
| Sodium | Magnesium | Potassium |
|---|---|---|
| Bone broth Boullion cubes Bacon Salted nuts Pickles | Seaweed Seeds Nuts Avocado Leafy greens | Potassium chloride Avocado Bone broth Spinach Broccoli Mushrooms Beef Pork |
Keto Diet Types
People follow a keto lifestyle for different reasons. Some do it just to lose weight, others are after better overall health, increased energy, and reduced inflammation.
Strictly speaking, the defining factor of a keto diet is the metabolic state of ketosis, which is achieved by restricting carbs. However, many people (myself included) also reduce or eliminate processed, inflammatory, or low-nutrient foods.
Below is your keto cheat sheet summary of the different ways that people follow keto. You choose what works best for your goals and lifestyle!
- Strict Keto – Up to 20-30g net carbs daily, count all calories and macros, and eat clean, unprocessed foods.
- Lazy Keto – Up to 20-30g net carbs daily, and track only net carbs OR eat keto foods without tracking.
- Dirty Keto – Up to 20-30g net carbs daily, with “if it fits your macros” approach including processed foods.
- Low Carb – Up to 50-100g net carbs daily, less strict.
For a more detailed listing of these different types of keto with pros and cons, grab the Easy Keto Cheat Sheet Printable PDF below!
Want The Keto Cheat Sheet Printable PDF System?
Get all this information and MORE in convenient printer-friendly format – 13 cheat sheet pages you can take with you anywhere or keep in your kitchen, plus 4 recipe cookbooks! Includes:
- Keto food list (230+ foods) – Super detailed & color-coded, with net carb counts, so you’ll know exactly what to eat.
- Foods to avoid on keto – Detailed and specific list so that you know exactly what to watch out for.
- Macros cheat sheet – Explains everything you need to know about macros to succeed on keto.
- Keto food swaps (60+ swaps) – Covers virtually every food you love, so you don’t have to miss out!
- Keto meal formula – With specific food ideas, so it’s easy to mix-and-match.
- Keto flu guide – Understand what it is and exactly how to avoid it.
- Electrolyte cheat sheet – With whole food ideas + bonus keto tips.
- Keto Diet Types – Summary of 4 ways to do keto, so you can choose what fits you best.
- FOUR (4!) Keto Swaps Recipe EBooks – Dozens of recipes to replace bread, rice, potatoes, pasta, desserts, and other carbs you’d otherwise miss.
Get The Printable Keto Cheat Sheet System (75 pages, Only $37!)
Beef Tenderloin Recipe (Tender & Easy)

Let me show you how to cook the perfect roast beef tenderloin recipe, with garlic, butter, and fresh herbs. It’s melt-in-your-mouth tender!
Scan this QR code with your phone’s camera for the full recipe, including tips, step-by-step photos, and storage, or to save it to your account. You can also find it at: https://www.wholesomeyum.com/beef-tenderloin/
Ingredients
- 1 4-lb Beef tenderloin (trimmed to remove silver skin - the butcher can do this for you)
- 4 tsp Sea salt (1 teaspoon per pound of meat)
- 1 tsp Black pepper (1/4 teaspoon per pound of meat)
- 6 tbsp Butter (softened at room temperature)
- 6 cloves Garlic (minced)
- 1 tbsp Fresh thyme
- 1 tbsp Fresh rosemary (chopped)
- 1 tsp Dijon mustard (optional)
- 2 tbsp Olive oil
Instructions
- Cut the beef tenderloin in half crosswise. Pat dry with paper towels. If you have time, place the beef tenderloin in the fridge, uncovered, for 8-12 hours or overnight. (This is not absolutely necessary, but helps create a better outer crust when searing, so do it if you can.)
- Tuck the long, thin end underneath. Use kitchen twine to tie each piece of tenderloin tightly, at one-inch intervals – see post above for instructions and pictures for how to tie it.
- Pat the beef with paper towels again. Season all over with salt and pepper. Let it come to room temperature on the counter for 1 hour before cooking.
- Preheat the oven to 400 degrees F (204 degrees C).
- In a small bowl, mash together the butter, garlic, rosemary, thyme, and Dijon mustard (if using). Set aside.
- Heat the olive oil in a large cast iron skillet over medium-high heat, until shimmering and very hot. Add the beef tenderloin pieces, without touching each other, and sear on all four sides, about 2-3 minutes per side, until a brown crust forms. (If the beef doesn’t want to stay on one of the sides, use tongs to hold it against the pan.) Sear for slightly less time on the last side, as it will continue to sear while you spread on the butter in the next step.
- Working quickly, immediately spread the butter mixture over the beef, insert a probe thermometer into the thickest part in the center, and transfer to the preheated oven. (Alternatively, if searing in a pan that is not oven-safe, transfer to a roasting pan before placing in the oven.)
- Roast beef tenderloin in the oven until it reaches your desired internal temperature: 115 degrees F for rare (20-30 minutes), 125 degrees F for medium rare (25-35 minutes), 135 degrees F for medium (30-40 minutes), 145 degrees F for medium well (35-45 minutes), or 155 degrees F for well done (40-50 minutes). (Temperature will continue to rise while resting in the next step.) For the juiciest beef, medium rare to medium is recommended.
- To prevent overcooking, immediately transfer the roasted beef tenderloin to a cutting board after removing from the oven. Let it rest for 10-15 minutes to allow the juices to settle – the internal temperature will rise an additional 5-10 degrees.
Maya’s Recipe Notes
Serving size: ~1/3 lb (weight prior to cooking), or 1/12 of the entire roast
- Tips and timing: Check out my recipe tips above to help you cook beef tenderloin to juicy perfection with a perfect crust, and my time chart to get exactly the doneness you like.
- Store: Keep leftovers in an airtight container in the refrigerator for up to 3-5 days. They make an amazing steak salad !
- Reheat: I find it best to reheat this beef tenderloin recipe in the oven at a low temperature, 250-300 degrees F. Wrap it in 2 layers of foil and place directly onto the oven grates (a baking dish is more likely to overcook it), and bake for 10-15 minutes, until warm.
- Freeze: You can freeze the raw meat for up to 1 year, or cooked for up to 3 months.
I provide nutrition facts as a courtesy. Have questions about calculations or why you got a different result? Please see my nutrition policy .
© Copyright Maya Krampf for Wholesome Yum. Please DO NOT SCREENSHOT OR COPY/PASTE recipes to social media or websites. We’d LOVE for you to share a link with photo instead. :)
